Monday, November 15, 2010

The Last Felt Flower


The Last Felt Flower

A couple of weeks ago I showed you how to make a fun felt flower on the autumn bloom belt.  Well, today I wanted to show you one more take on that flower.  I switched up a couple of things and I wanted to share it with you.  So, here's the last felt flower tutorial.  Then there will be no more.  I don't want to beat a dead horse.  (Okay I'm probably not beating a dead horse to you, but I feel like I've done a lot of felt stuff since my sister and I did a lot of it on our headbands.  Maybe I'm just talking to a dead horse...no that sounds worse.  Forget the dead horse.  Let's move on.  I'm pretty sure you're not supposed to have this many sentences between one set of parentheses anyhow.)


The flower making process is almost identical to the flowers on the autumn bloom belt, but I used pinking shears to cut the strip first.


Then I made my slits occur in the corners the pinking shears created.  See?  It makes for a really fine, consistent flower.  Then I rolled the flower as I did on the other tutorial. 


Lastly, I cut leaves from a large grograin ribbon and melted the edges so they wouldn't fray and so they'd look cool.


I like to use the same color felt as my base so that any of it shows, you won't really notice.  I glued the leaves down and then the flower.  Then I trimmed away the extra felt of the base.


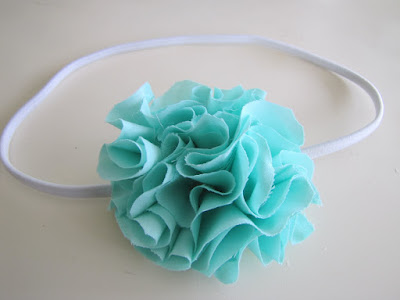
I love the versatility of a good flower.  It can go on a headband, on a shirt as a pin, on a bag, on a belt, or pretty much anywhere you need it.  This light blue one kind of has a fun winter feel to it.


Sidenote: If you don't have a strip of felt as long as you need to make the size flower you want you can always piece together a few different strips and you'd never notice. Just a tip.

Thanks for dropping by.  Tomorrow I have a post that a lot of you have asked about.  My sister is going to show you how to give a little guy a good haircut.  See you then!

Scrunch Fabric Flower Pom Pom Headband Tutorial


Scrunch Fabric Flower Pom Pom Headband Tutorial
{NOsew step-by-step instructions}
{{featured on Headband Week}}


Ready to learn how to make your very own Flower Pom headband?!

Here's what you'll need:
About 20-30 circles cut out of the fabric of your choice {about 1.5 inch circles}
Elastic Headband {purchased at Target}
Hot glue and glue gun
Scissors
Felt

Let's get started!

Cut out one felt circle in the size you want your pom pom to be.
Take one of your fabric circles and scrunch from the middle.


Add glue to the end of the scrunched portion.


Place glue-side down on the center of the felt circle.


Continue to add the scrunched fabric circles around the center one.


...and add some more.


and some more...


and more...


Until voila! You have a full and fluffy pom pom!


Now flip over your pom and grab your elastic headband.


And glue your headband to the center of the pom.


Then apply the second felt circle on top of the headband to cover the band.


And now you have a fun pom headband!


Stay tuned for more fun tutorials on HEADBAND WEEK at Little Miss Momma!  And come back on Friday to link up to our first linky party EVER, for all things headband related!

Happy Headbanding!

I will be linking this project up to these fab link parties!

Rose Barrettes


Molly's Sketchbook: Rose Barrettes

With Valentine's Day coming up I designed these little girl's barrettes in celebration of the rose. I liked the idea that they could add a little Valentine's spirit to any outfit, and also to be used long after the big day. --Molly

Materials

Cutting

Cut out all of the pieces from the Rose Barrette Pattern. You will have:
  • one rosebud strip in color A
  • one 1st tier petal piece in color A
  • one 2nd tier petal piece in color A
  • one barrette top in color B
  • one barrette bottom (with a small slit cut as marked) in color B

Making the Rosebud

Roll the rosebud strip tightly, lining up the straight edge, starting from the smaller end to form a little rosebud shape as shown above.
Thread a length of embroidery thread that matches the color of the rose. Turn the rosebud upside down and sew across the bottom, through all of the layers, bisecting the circle of the bottom. Pull this stitch taut and take another stitch through the same area.
Turn the rosebud 90-degrees and take another stitch through all the layers perpendicular to the first set of stitches.
Pull this stitch tight and take another stitch in the same place. Tie a knot and cut the embroidery thread.
You will have a pretty little rosebud.

Adding the Petals

Place the finished rosebud in the center of the 1st tier petal piece.
Tack the 1st tier petal piece to the back of the rosebud with a few stitches.
Stitch the adjacent petals of the 1st tier petal piece to one another as shown above. As you stitch them together sew through the side of the rosebud piece and at the same time tacking the two pieces together.
Sew all the adjacent petals together in this manner.
Repeat this process for the 2nd tier petal piece.
The rose is now finished! These are beautiful on their own and could be attached to flower wire for a pretty bouquet or sewn to anything you please.

Preparing the Barrette

Slip the small part of the barrette into the slit of the barrett bottom piece as shown above.
Meanwhile, sew the rose onto the wide end of the barrette top piece.

Finishing the Barrette

Place the two barrette pieces wrong sides together and sew them to one another with a small running stitch around the perimeter of the barrette. When you come to a petal sew through a bit of the petal, not all the way through the width felt but just a little tack to keep the petal down.
Continue sewing around the perimeter as shown above.
Once you get all the way around tie a little knot and hide the threads tail in between the two layers.
Turn the barrette to the right side and trim the rose's petals to your liking.
Repeat this for all of the barrettes and have a happy Valentines Day!